+91 9211493190
The skill of pencil shading is the most fundamental of all techniques that can breathe life into even the most simple of sketches. Mastering pencil shadings is the same as leveling up artistry regardless of the level of an artist. In this comprehensive guide, we will discuss the fundamental methods, tools, and tips for rendering realistic drawings that seem believable beyond art.
Why Pencil Shading is Important for Realism
Pencil shading is the mechanism that provides dimension, texture, and warmth in a drawing, bringing an essence of life into it. Pencil shading is useful in :
- Creating smooth transitions between light and dark areas
- Enhancing the three-dimensional effect of objects
- Defining the textures of different materials (e.g., skin, hair, fabric)
- Improving the overall realism of an artwork
Through the knowledge of different shading techniques, you can unleash a professional-level finish on your pencil sketches.
Essential Tools for Pencil Shading
Before we talk about different shading techniques, it must be imperative to note the tools:
1. Graphite Pencils
Graphite pencils range in hardness from hard (H) to soft (B). However, use a variety of pencils for creating different shade effects:
- H Pencils (2H, 4H, 6H) – Light, fine lines, great for initial sketches
- B Pencils (2B, 4B, 6B, 8B) – Dark, smooth strokes, perfect for deep shadows
2. Blending Tools
- Tissue paper or cotton pads – For soft, smooth shading
- Blending stumps – For controlled blending in small areas
- Finger blending – Works well but can add unwanted oil from the skin
3. Erasers
- Kneaded Eraser – Perfect for lifting graphite without smudging
- Vinyl Eraser – Good for clean, sharp highlights
- Precision Eraser Pencil – Best for detailed highlights
4. Sketching Paper
Paper with some texture (medium-grained) is more likely to retain the graphite properly for fine blending.
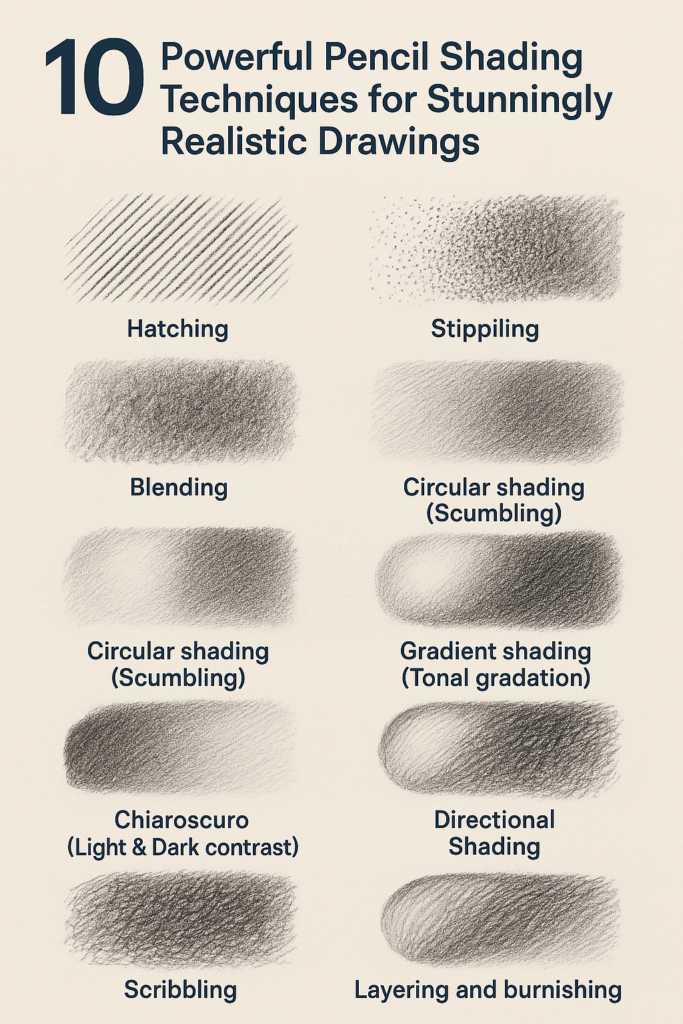
10 Essential Pencil Shading Techniques for Realistic Drawings
1. Hatching
Hatching is one of the easiest shading methods wherein fine parallel lines close to each other give tones and depth to the image.
- Light hatching: Keep lines thin and spaced apart
- Dark hatching: Use thick, closely packed lines
- Best for: Textures like wood, fur, and rough surfaces
2. Cross-Hatching
Cross-hatching involves parallel lines but with those laid down at different angles for depth and variation in contrast.
- Apply layers for darker tones
- Works well for portraits, fabric, and shadows
3. Stippling
Stippling involves the creation of shadowing and texture through tiny dots.
- Densely packed dots = darker areas
- Widely spaced dots = lighter areas
- Best for: Skin textures, clouds, and soft gradients
4. Blending (Smudging)
Blending induces the smooth transition between various shades of light and dark.
- Use a blending stump, tissue, or cotton pad
- Avoid over-blending to maintain depth
- Best for: Skin shading, soft shadows, and smoke
5. Circular Shading (Scumbling)
This involves working in fine circular strokes giving texture and letting some slips of white paper create soft white regions.
- Works well for shading curved objects
- Ideal for realistic skin, fabric, and soft surfaces
6. Gradient Shading (Tonal Gradation)
The gradual change of tone from dark to light conveys depth and a 3D effect on volume.
- Apply more pressure for darker areas
- Lighten pressure gradually for smooth transitions
- Best for: Portraits, still life, and landscape shading
7. Chiaroscuro (Light & Dark Contrast)
Strong contrasts between light and shadow best result in a dramatic effect; this technique is also called Chiaroscuro
- Identify the light source and shade accordingly
- Create deep shadows and sharp highlights
- Best for: Portraits and dramatic compositions
8. Scribbling
Holding the pencil loosely, scribbling overlaps strokes of random direction to build up tone and texture.
- Very effective on hair, bushes, and rough surfaces
- Creates dual-toned shading with that sketch-like effect
9. Directional Shading
Shading in the direction of the object gives realism.
- Shading in the direction of the object gives realism.
- Curved for rounded surfaces
- Straight for flat surfaces
- Best for: Faces, Bodies, and Organic Shapes
10. Layering and Burnishing
Layering allows many layers of graphite to be built to form deeply shaded areas.
- Start with light strokes and overlay darker layers
- Burnish with an eraser-tissue to smoothen out the final shading.
- Best for: Realistic skin, metal, and glass
Step-by-Step Guide to Shading a Realistic Portrait
Step 1: Sketch the Outline
With a 2H pencil, outline the subject lightly. Make sure to keep the lines soft; do not press heavily.
Step 2: Identify the Light Source
Acknowledge from where the light is coming and shade accordingly.
Step 3: Apply Base Shading
Hatch lightly or smudge away in circular motions to create an even shading.
Step 4: Add Shadows
Use a 4B-6B pencil to darken shadow areas, such as under the nose, chin, and eyes.
Step 5: Blend for Smoothness
Blend harsh lines by rolling a stump or using tissue.
Step 6: Create Highlights
Apply a kneaded eraser on the nose, cheeks, and forehead to lift the graphite for highlighting.
Step 7: Detail Work
Always be careful drawing the fine lines for eyelashes, wrinkles, or hair strands using a sharp pencil.
Step 8: Final Touches
Sharpen edges; deepen the shadows to achieve that professional look.
The Blunders Most Artists Commit in Pencil Shading
- Pressing Too Hard Too Soon – Do not start pressing hard immediately but build layers progressively into real darkness.
- Overusing Blending – Blending too frequently results in a flat look.
- Ignoring the Light Source – The most essential thing that should be taken into consideration while shading is placing the light and shadows properly.
- Using Only One Pencil – The use of different grade pencils adds contrast and depth to the drawing.
- Not Sharpening the Pencil Enough – AWhile shading, do tab-sharpen your pencil as that could be messy with your detailing.
Conclusion
A thorough understanding of pencil shading is achieved after long practice, a sustained wellness of experience, and keen attention to detail. While exploring the style of shading, be it hatching, cross-hatching, smudging or layering, take a step closer to reality with highly realistic art. The exercises will improve whatever the art form mentioned above, whether portraits, landscapes, still-lives, can be made so much better when shading is appreciated.
Practice and study natural lighting or exposure but ignore your mistakes and focus on creating intensely realistic drawings!